Wednesday, July 20, 2011

Zebra Cake

This month the Cake Slice bakers present a Zebra Cake, from Cake Keepers by Lauren Chattman.  I have been wanting to try this cake for a while, but never got around to making one, so was very excited when it was announced as July's winner.   
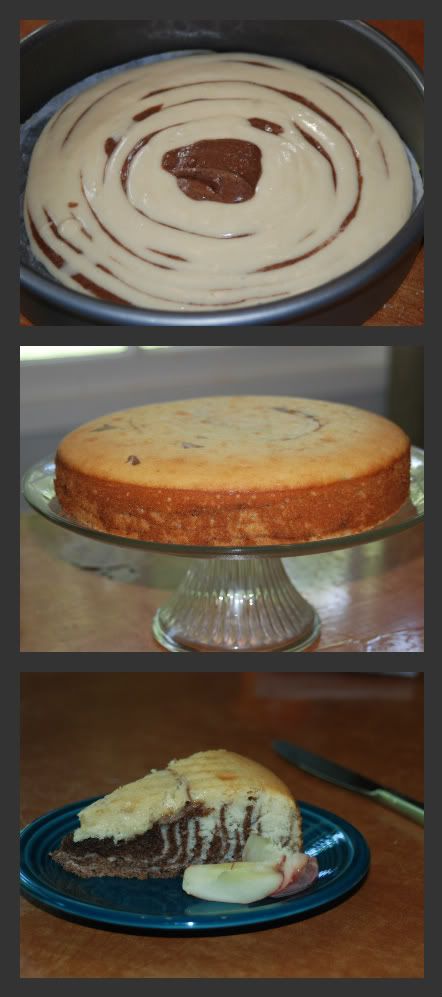
The flavor of the cake is good, nothing exceptional but a good base cake.  It is nice and moist with subtle flavor.  A fruit compote or a little sauce would be a nice addition to this cake.  I had wanted to try it with a strawberry sauce, but the cake disappeared before I had a chance to make a sauce.
I was very disappointed with the appearance of my cake.  I rushed when pouring the batter and didn't get defined stripes.  I miscalculated how much time I had to make the cake and ended up with an under baked cake, and kids who were still waiting for a ride home 15 minutes after camp ended.   Despite the appearance of my cake it is one that I will make again.  It is a fun cake to cut into and with some enhancements on the side is a nice after dinner informal cake.
Make sure you check out other cakes from the Cake Slice bakers.

Zebra Cake 
(Recipe from  Cake Keeper Cakes by Lauren Chattman)
Printer Ready                                                    


Ingredients
2 cups unbleached all purpose flour
1 tbsp baking powder
¼ tsp salt
4 eggs
1 cup sugar
1 cup whole or 2% milk
½ cup (1 stick) butter, melted and cooled ½ cup vegetable oil
2 tsp vanilla extract
2 tbsp unsweetened Dutch cocoa powder

Method
Preheat the oven to 350F. Grease a 9 inch pan, line with a circle of parchment paper, grease the parchment and dust with flour. Combine the flour, baking powder and salt in a medium bowl.
Combine the eggs and sugar in a large mixing bowl and beat with an electric mixer on high speed until thick and pale, about 5 minutes. With the mixer on low speed, stir in the milk, butter, oil and vanilla, scraping down the sides of the bowl once or twice as necessary. Stir in the flour mixture, ½ cup at a time.
Transfer a third of the batter into another bowl and whisk in the cocoa powder.
Place a quarter cup of the vanilla batter into the centre of the pan and let it stand for a few seconds so it spreads out slightly. Place 2 tablespoons of the chocolate batter right on top of the vanilla and wait another few seconds until it spreads. Continue alternating vanilla and chocolate until you have used up all the batter and it has spread to the edges of the pan.
Bake until the cake is set and a toothpick comes out clean, about 40 minutes. Cool in the pan for 10 minutes. Run a sharp knife around the edge of the pan and invert the cake onto a cutting board. Peel away the parchment paper. Re-invert onto a wire rack and cool completely. Slice and serve.
Store uneaten cake in a cake keeper or wrap in plastic and store at room temperature for 3 days.

Tuesday, July 19, 2011

Fruit Salsa

It's that time of year where fruits are ripening and coming in faster than we can eat them.   We aren't as overloaded with fruits from our current CSA as we were in previous years with our other provider, but we are still having trouble keeping, so I have to come up with ways to use it up before it goes bad.  I usually think of fruit as a side with breakfast or lunch, as a great snack or perfect for desserts, but I usually don't use it when cooking dinner.  So this summer I am challenging myself to incorporate more fruit in our main meal, and so far it has been a fun challenge. 
Last week I had small amounts of cherries and blueberries that needed to be used.  So, I broke out the cherry chopper and made a lovely berry salsa to put on top of our grilled fish.  This isn't a very adventuresome way to incorporate fruits into a meal, it is a basic recipe.  What's good about it is you can use whatever fruits you have on hand and use it top whatever protein you have on hand - fish, chicken, pork - they are all good.

The recipe below is based on what I had on hand, but is easily altered based on what is available and personal preference.

Berry Salsa
1/2 c. Cherries, pitted and roughly chopped
1/2 c. Blueberries
1/4 c. Diced Red Onion
1 Tbs. Finely diced Jalapeno
1 tsp. Rice Vinegar
Juice from 1/2 lime

Mix all ingredients together.  Add salt and pepper to taste.  Let rest about 20 minutes before serving.

Monday, July 18, 2011

Secret Recipe Club - July

It is time for the Secret Recipe Club! This month I was introduced to Judee at Gluten Free A-Z.   I usually don't spend a lot of time on blogs dedicated to allergy or gluten free diets.  My husband has some food allergies, but they don't effect our daily diet so they aren't sites I seek out.  After spending time on Judee's blog I might be more apt to seek out similar sites.  Her blog is filled with lots of great recipes and healthy living suggestions.  It was tough making a decision on what to make.  Her quinoa salad looked great and it is a flavor combination I love, but I wanted to try something new and different.
I decided to try the Gluten Free Banana Oatmeal Cookies.  I decided on these because they sound great and because I have been looking for new recipes that kids can easily make on their own for a snack.  I have a similar 3 ingredient recipe for Peanut Butter cookies that I recently taught them, and that they love, and thought this would be a good addition to their recipe collection..
The kids had fun making these cookies, although Maggie was a little put off by our super ripe bananas.  She definitely eats with her eyes and the browning of the bananas was a little too much for her.  The kids are use to a sweeter cookie so we decided to experiment with the recipe a little by adding some peanut butter and honey.  These cookies were different from what the kids are use to, but they had fun making them and like having another recipe that they can do on their own.
Banana Oatmeal Cookies
adapted from Gluten Free A-Z

4 Banana, slightly over ripe

2 c. Old Fashioned Rolled Oats
2 Tbs. Peanut Butter

1/4 c. Chocolate Chips

Preheat oven 350
Mash bananas.  Add oats and peanut butter, stir until combined.  Mix in chocolate chips.
Drop spoonfuls onto parchment lined cookie sheet.  Bake for 15 minutes or until tops are slightly browned.


Friday, July 15, 2011

Going Away Cake

At the beginning of summer we had to say good-bye to our neighbors who were moving across country.  We did a neighborhood going away party and I was tasked with making a going away cake.  I had plenty of time to do the cake and the family is originally from Hawaii so I knew I wanted to do something with tropical flowers, but wasn't sure what.  My piping skills aren't that great, so buttercream flowers where out of the question. I decided to think about it for a while and hope for some inspiration. I gave it so much thought that it was the night before I needed the cake and I still had not decided what to do.  This indecision ruled out dried fondant/gum paste flowers, so chocolate flowers it was.  Waiting to the last minute meant I had to use what was in my stash, which was yellow and brown chocolates, so they got sunflowers and not the beautiful tropical flowers I had envisioned.  
This was definitely a rushed last minute cake and it shows in the final product, but most of the cake was eaten at the party, with just enough leftover for them to enjoy the next day.

Thursday, July 14, 2011

Cherry Coke and Strawberry Daiquiri

This past weekend I went back to the 80's.  A friend was celebrating her 40th birthday and her husband threw her a great party.  We started off with a wonderful dinner where we all behaved like adults and then regressed back to our youth as the night went on.  The birthday girl requested a cupcake bar at her celebration.  She didn't request any particular flavors, just a fun variety.  I worked with another friend to come up with a couple flavor options and after much deliberation we decided on Strawberry Daiquiri, Key Lime, Cherry Coke and Chocolate Cream.  I didn't get any pictures of the final cupcake display, we didn't set it up until later in the evening and had left the "adult" stage far behind us.  I am hoping there is a picture of the cupcakes out there somewhere as we decided to make themed cupcake wrappers about 3 hours before the party.  We found paper reminiscent of each of her 40 decades and cut wrappers using this template.  They took more time than we anticipated, but they were really cute and made the display look wonderful.
I made the Strawberry Daiquiri and Cherry Coke cupcakes and was very happy with both.  I have been playing around some adult flavor cupcakes and the Strawberry Daiquiri is definitely one I will be adding to my list.  The rum taste was subtle, but flavorful enough that you knew what you were having.  I opted with a buttercream frosting since they were going to be in the car and then sitting outside, but I think they would be great with just simple whipped cream topping.

For the daiquiri cupcakes I used a basic white cake mix and followed the directions on the box replacing the water with daiquiri mix and rum and adding a little lime zest.  As I said they were flavorful without being overly powerful.  I topped them with a rum and lime zest buttercream and they were decorated with a little more zest and half a strawberry.

The Cherry Coke cupcakes were also a big hit, both within my family and at the party.  I was lucky to leave the house them, I think Will would have been happy eating the entire batch.  The coke flavor is not very strong, but it does give the cupcakes a great texture and when mixed with the cherry juice you definitely know what you are eating.  Steph over at Cupcake Project recommends using Kola extract to enhance the flavor.  I was short on time and wasn't able to order some for this batch, but would love to have some on hand for future batches, it would make these cupcakes perfect.


Cherry Coke Cupcake
Printer Ready  makes 24 cupcakes

3 c. Flour
1/4 c. Cocoa Powder
1 tsp. Baking Soda
1 1/2 c. Sugar
1/2 tsp. Salt
2. c. Butter, at room temperature
1 c. Buttermilk
2. c. Cocoa-Cola
1 tsp. Maraschino Cherry Juice
24 Maraschino Cherries, stemless


Preheat oven 350.  Line cupcake pan with wrappers, set aside.  

Sift together flour, cocoa powder, baking soda and salt, set aside.  In bowl of electric mixer cream sugar and butter, mix together until light and fluffy.  In medium bowl mix together buttermilk, cocoa-cola and cherry juice.  Alternately add flour and liquid mixture to creamed butter, beginning and ending with the flour.  Divide batter evenly between cupcake tins.  Drop one cherry into each cupcake.  Bake for 15 minutes or until tester comes out clean.
Top with cherry flavored buttercream and whole cherry
.  

Cherry Buttercream
Printer Ready


½  c. Vegetable Shortening
½ c. Butter, at room temperature
4 c. Confectioners Sugar, sifted
1 Tbs. Milk
2 Tbs. Cherry Juice
¼ c. Finely Chopped Maraschino Cherries

In mixing bowl cream shortening and butter together until smooth and blended.  Slowly add confections sugar, scrapping bowl as necessary.  Add milk mix until fluffy.  Add cherry juice, mix until combined. Carefully stir in cherries.