Tuesday, September 18, 2012

Bacon Day

Tuesdays have recently become "bacon day" in our house. We don't sit around eating bacon all day as tasty at that might be.  What we do do, is bake a special treat.  Tuesdays are our quiet unplanned days, it is also the day that my youngest tells me she never gets to do anything fun and it isn't fair that she doesn't get to go to school everyday like her brother and sister.  To help make her feel better I told her that we would make Tuesdays our special baking day - or "bacon day" if you are 3 and have trouble making "-ing" sounds.

This week we went for a classic, everyone's favorite M&M cookies. 

Like most 3 year old kids scooping and dumping is tons of fun for Edy, so she was in charge of scooping the ingredients into the measuring cups, then pouring into the mixing bowl.  Edy's other main job was the placement of M&Ms.  She alternated between over loading the cookies to only putting one candy on, for fear there wouldn't be enough candies leftover for her to eat when we were done.   


As always, kids learn a ton just being in the kitchen, but if you are looking to get a little extra teaching in while baking, M&Ms are a wonderful teaching tool.  Some fun ways to use them are:
  • Have the kids place the candies in a pattern
  • Ask them to put 3 red, 2 green and 2 yellow then have them tell you how many candies are on the cookie
  • Tell the kids each cookie needs 10 candies and they can only use 3 colors.  How many of each color is used?
 M&M Cookies (Printer Ready)

1 1/2 teaspoons pure vanilla extract
2 cups all purpose flour
1 1/4 teaspoons baking soda
1/4 teaspoon salt
1 cup unsalted butter, room temperature
1/2 cup  granulated white sugar
1/2 cup firmly packed light brown sugar
1 large egg
1 egg yolk
1 cup M&M's

Preheat oven to 350°
In large bowl whisk together flour, baking soda and salt, set aside. In large mixing bowl combine butter and sugar, mix until light and fluffy.  Add eggs and vanilla, beat until just incorporated.  Add flour mixture, again mixing until just incorporated.  

Using a medium sized cookie scoop place balls about 2 inches apart on ungreased parchment lined baking sheet.  Place M&Ms on top of cookie.  Bake for 8-10 or until light golden brown.

*Note M&M’s can be added to the batter after the flour has been mixed in, but I like to put the candies directly on the dough to ensure they stay at the top of the cookie.    


I hope to continue Tuesday Baking Day. It is a nice way to spend some extra special time with my baby Whatever day is your "bacon day" enjoy it with someone special. 


Monday, September 3, 2012

Nutella Cheesecake

I can't believe a month has passed since my last post.  August just flew by and while we had lots of fun with family and friends making the most of our summer days I am definitely ready for the Fall routine to begin.  I am ready to begin thinking about back to school and what to back in school lunches.

I will have to pack two lunches this year, so I want to have some extra special treats for my veteran 2nd grader and my newbie in Kindergarten.  When I came across the recipe for Nutella No Bake Cookies on Cook Lisa Cook I knew I had found the perfect thing not only for school lunches, but for this month's Secret Recipe Club as well.


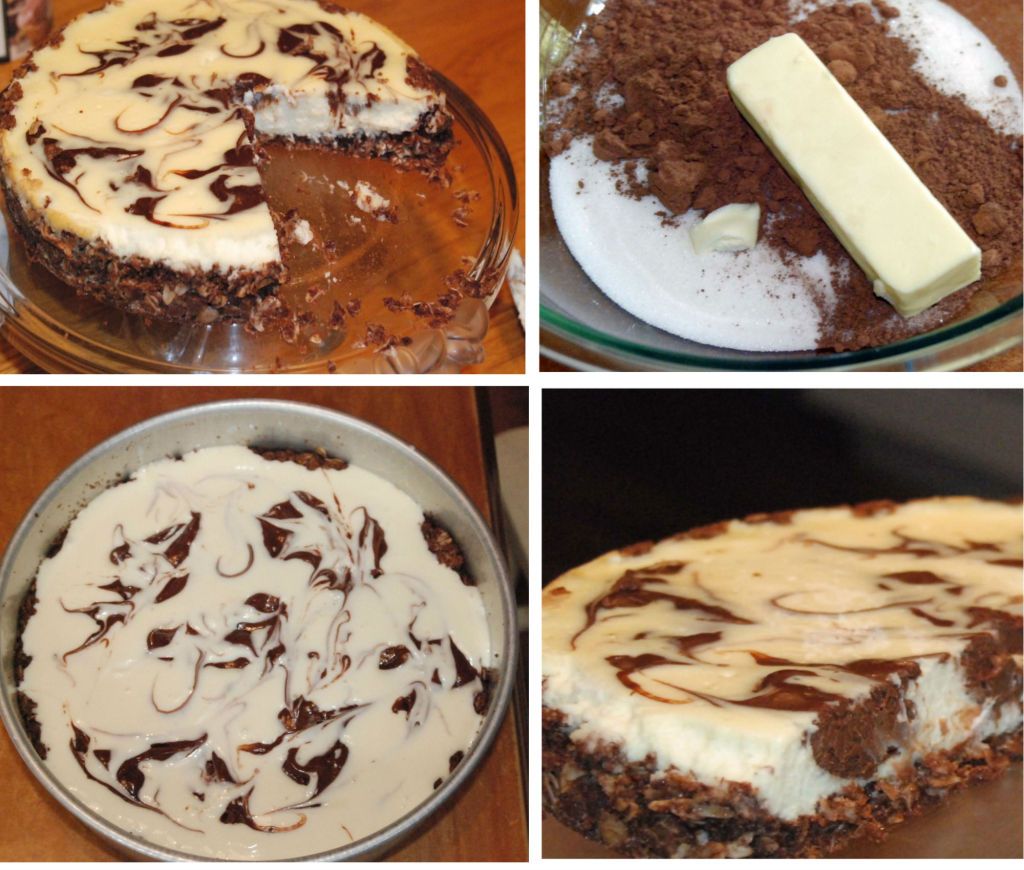
Now if you look at the title of my post and the name of Lisa's recipe you have probably guessed I didn't make cookies. When I went to make the cookies I only had a little milk left and didn't want to use it up.    What I did have plenty of was cream cheese.  I thought about looking for a new recipe, but I was really excited about using the Nutella.  Then it hit me Lisa's No Bake Cookies would make the perfect base for a cheesecake.

I kept everything else in the recipe the same.  The result was a thick and crumbly dough that formed into a good ball when pressed together - the perfect crust for holding a nice creamy cheesecake.  The recipe was large.  I was able to make a really thick crust that went high up the sides - which is my favorite way to have a cheesecake - and still had some leftovers.  My family managed to eat their way through the leftovers a handful at a time and while this made an amazing snack I would recommend reducing the amount of sugar and oats to create a smaller batch.

cheesecake.jpg cheesecake

This is an amazing flavor combination.  I loved it as a cheesecake base and am looking forward to giving the cookies a try as well!


Nutella Marble Cheesecake

Nutella Base:
2 cup sugar 
1/4 cup cocoa
1/2 cup butter
1 tsp vanilla
pinch of salt
1/4 cup smooth peanut butter
1/4 cup Nutella
3 cup Old Fashioned Oats

Marble Cheesecake:
3 ounces bittersweet chocolate
1 pound cream cheese, at room temperature
1/4 cup sugar
3 eggs
1/2 cup sour cream
1 tsp. vanilla


Base:
Butter 9 inch spring-form pan.  Preheat oven to 325.
In a microwave safe bowl combine the sugar, cocoa and butter.  Heat in one minute intervals stirring after each minute until the butter and is melted and all the ingredients are combined.  Remove from the microwave and add the vanilla, salt, peanut butter and Nutella.  Stir to combine until smooth.  Stir in the oats until combined.  Press mixture into the bottom and up sides of prepared pan.  Bake for 8-10 minutes.  Let cool

Filling:
Place chocolate in the top of a double boiler and melt over hot water.  Let cool.
Place cream cheese and sugar in bowl of food processor or mixer.  Process/mix until combined and smooth.  Add eggs, sour cream and vanilla, mix until combined.  Add 3/4 cup of cream cheese mixture to chocolate, stir until combined.  Pour remaining plain filling into the baked crust.  Spoon chocolate mixture over plain filling in distinct blobs.  Gently swirl chocolate into the light filling to marble it.

Bake in preheated 325 oven for 30 minutes, or until just barely set.  Turn oven off, leave door slightly ajar, and let cool in the oven for 1 hour.  Chill before serving.

Enjoy!